

Saturday, February 1, 2014
Monday, July 8, 2013
Chocolate garnishes
Source: How to Cook that
Do check out this great video on how to make your dessert look so much more stylish...
Tuesday, September 11, 2012
Autumn theme Wedding Table number
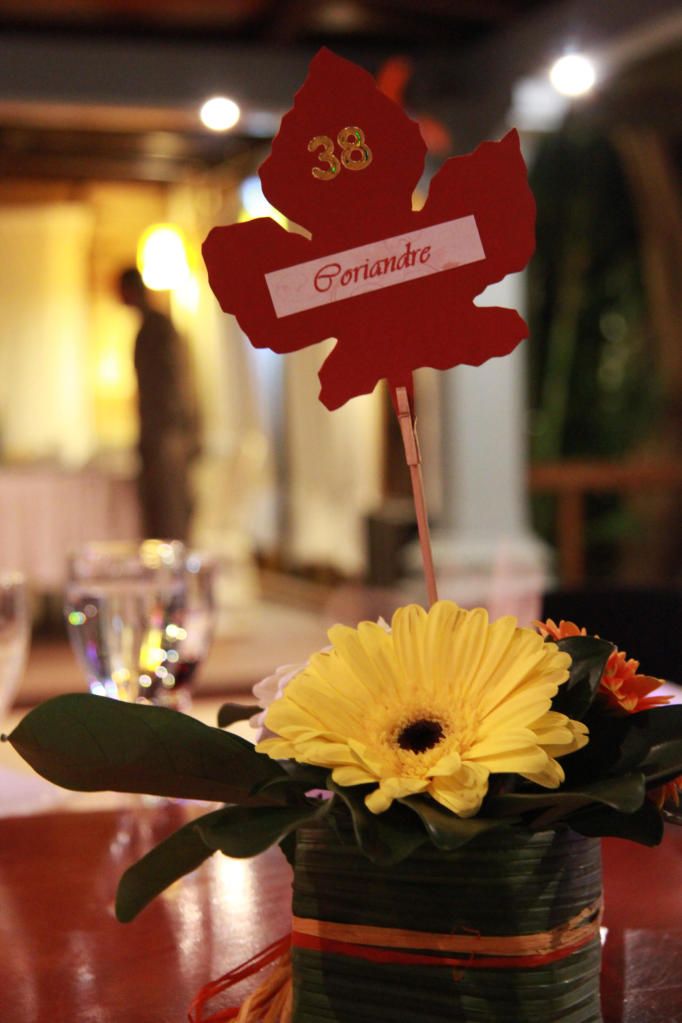
Sharing with you a craft project from June 2012. Better late than never right?! It was for my dear friend J, who was a beautiful June bride! We went for a simple table number based on her "Autumn theme" wedding decor and I added a zest of her other homeland, which you can guess from the Maple leaf...J went with a mini bouquet to hold the table number..
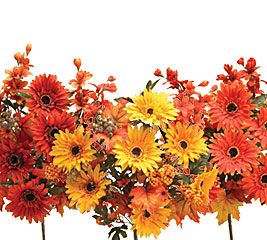
...Inspiration for her whole wedding decor originally stemmed from this picture that we fished online last year...
.:Materials& Instructions:.
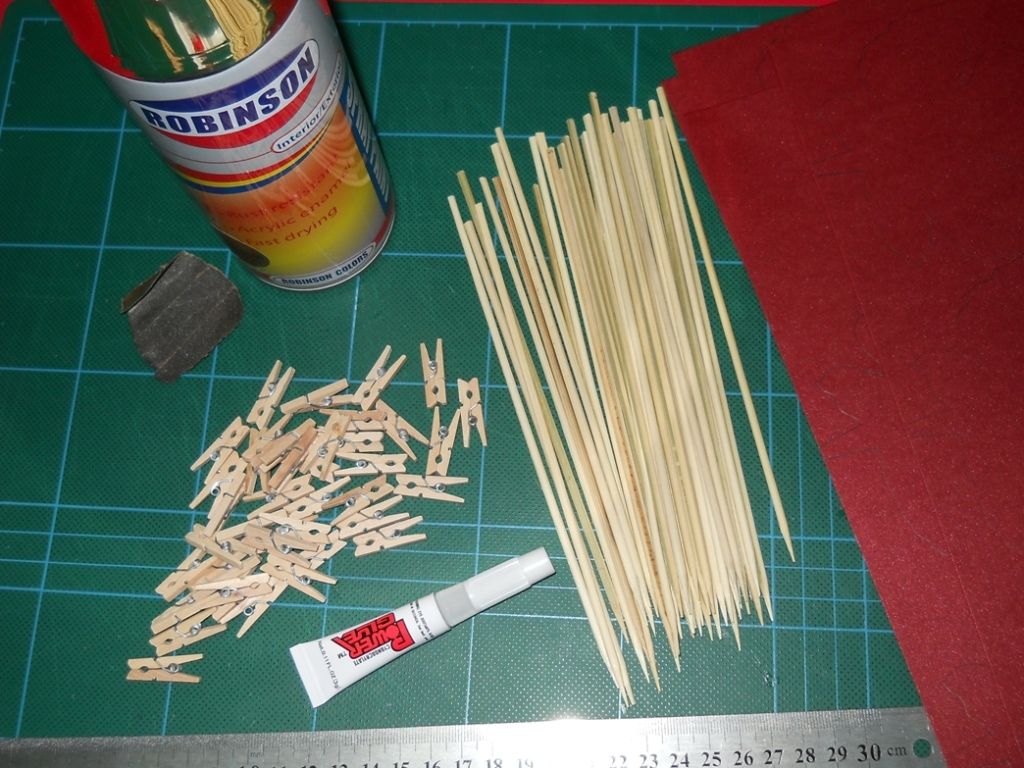
- Cardboard paper, sturdy enough to hold its shape
- Gold spray paint, to pretty up the base (skewer+pin)
- Mini-pins, to hold the leafs to the base
- Super glue & paper glue, you want to be careful with the super glue when making up the base
- Scissors, to cut out the stenciled leafs
- Pencil, to trace out the leafs on the cardboard
- Sanding paper, to smooth out any rough edges on the skewers
- Bamboo skewers, which you can chop to the desired length
- Stickers (0-9) in gold
- Customised labels for names, made up of fancy beige paper and designed using Excel, cut with an exacto knife
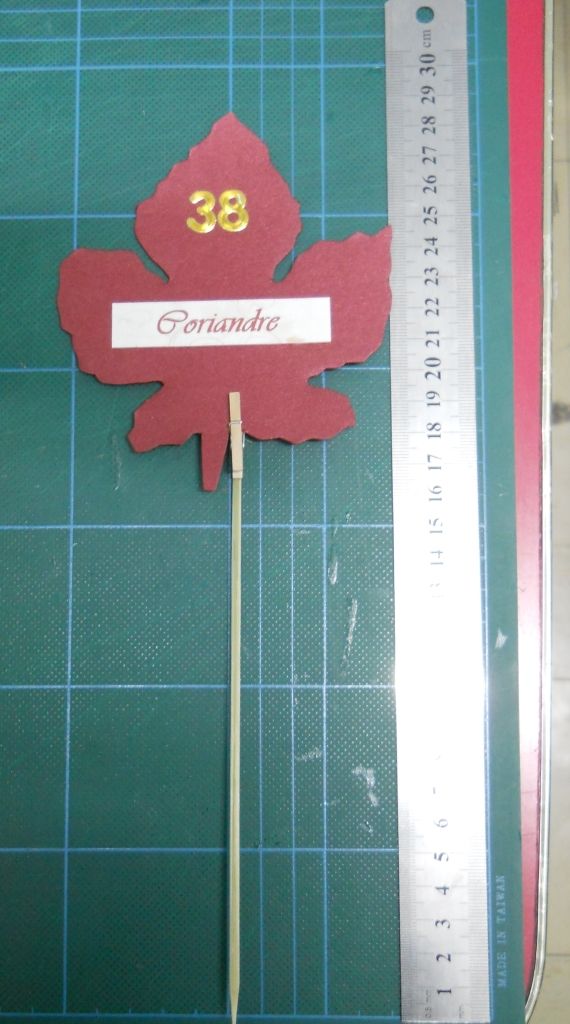
Voila!
Sneaking in a peek at her understated but very elegant wedding cake table...

All Photos by LiveYourStyle Atelier
Saturday, January 28, 2012


Tuesday, January 24, 2012


Monday, January 23, 2012
Origami- Winged Dragon
And here's the step by step how to:


.:Happy Dragon Year 2012:.
Sunday, January 16, 2011
Paper 3D Owl
 From 3EyedBear via NOTCOT
Hello, and how are you? (I feel like this is my first post on a brand new blog...I've tweaked a few things around L'Atelier, and I'm still working on a new banner, the above one is 'transitional'). Dear me, the last post related to Christmas! which feels like ages ago. It IS ages ago. So, here goes a free printable paper project by 3EyedBear, they have the coolest paper projects on their site. Make sure to visit.
Sunday, December 19, 2010
Christmas Decor

My upgraded tree. I've switched the gifts with a nativity scene, the same as last year's. (Taking photos at night, is NOT a good idea. But, I just wanted the lights on to show you).
Wednesday, December 15, 2010
Customized labels
 .:Gift Labels:.
 There are a LOT of great gift ideas out there at the moment. And tons of free ready-to-print gift labels too. Of course, you can always go ahead and buy some. But nothing beats some personal crafty ones, right? I made these with a re-purposed burlap (which was part of a gift wrap), simply cut into rectangles and frayed. I then stenciled the nicknames of the people to whom I'll be gifting, well the gifts (I can't really say what it is am gifting, I know for sure one of them might be reading right now lol), using fevicryl, my favorite brand of acrylic color, each in what I hope are their favorite colors. There! Done.
Monday, December 13, 2010
...Christmas 2010...


I've been saying how I wanted white & gold and may be silver or burlap for decorating the Christmas tree this year (...saying and not doing hem hem). Well, I tried to resist buying more commercial decor stuffs, and instead, went through my stash of ribbons (I don't hoard, I... collect some hehe). I found these perfect vintage white cotton trims (they are left-overs from my mom's sewing projects back when she was actually sewing clothes for herself!). And several pieces of white/off-white satin/organza ribbons. I was planning on making new ornaments with white felt,using this tutorial. But look at how 'charged' the tree is already. The 'skirt' is actually a white cloth and a gold voile superposed and just draped.
Monday, November 22, 2010
Red& Green birthday cake table decor


Ok...Please ignore the bad lighting... I wanted to share with you a simple cake table decor I whipped up for a family birthday party the other day, using papers. Super easy and quick projects. I used transparent nylon thread (0.4mm) to hang the pompoms and daisies, which I inter-spaced with sequins, threaded on a glittery DMC thread. And save for the tissue paper, I had everything else on hand already!
Thursday, November 11, 2010
Budget Party Decor: Decorating with paper
Paper can be fun, festive and ...cheap. Anyhow, paper is better than rubber(did you hear helium balloons' days are counted?) and low maintenance compared to fresh flowers. I love how people are using it more and more. Only google 'Decorating with paper' or 'DIY wedding' to see lots of amazing decor. I've rounded up a few ideas of how you can use paper for a party decor.
 ...Lighted Paper lanterns...


Make pom-poms using Martha's tutorial.

Wiki How has a good tutorial on how to make a 3D snow flake (It's easier than you think!).
I can also think of paper flowers, butterflies, papier mache, pinatas... a whole lot of other possibilities. Heck, paper cutting is an ART. So is paper folding.
Monday, November 1, 2010
DIY: Basic Cubic Ottoman from wooden crate

.: Ottoman After:.


.:Crate Before:.
Materials needed:
-Wooden Crate (Any dimension)
-Piece of Plywood (Saw a piece of 1/4 inch plywood to cover up the crate if it has an open side)
-Glue (All-purpose is ok)
-Felt (Thick enough for padding the sides)
-2 inch foam (The kind for padding sofas, to make the "seat") I also padded the bottom side with 1/4 inch foam (I used a kitchen knife to cut the foam & scissors to cut the felt)
-Staples, Nails (Let's say I want a staple gun for christmas)
-Fabric (Sofa quality, but thick curtain fabric should do), Matching Thread.
I won't talk about dimensions, since it entirely depends on the type of crate you can lay your hands on!
-Wooden Crate (Any dimension)
-Piece of Plywood (Saw a piece of 1/4 inch plywood to cover up the crate if it has an open side)
-Glue (All-purpose is ok)
-Felt (Thick enough for padding the sides)
-2 inch foam (The kind for padding sofas, to make the "seat") I also padded the bottom side with 1/4 inch foam (I used a kitchen knife to cut the foam & scissors to cut the felt)
-Staples, Nails (Let's say I want a staple gun for christmas)
-Fabric (Sofa quality, but thick curtain fabric should do), Matching Thread.
I won't talk about dimensions, since it entirely depends on the type of crate you can lay your hands on!


Step 1: Close up the crate by nailing the plywood. Step 2: Measure& cut the foam and felt for each side

Step 3: Glue the padding materials. A small amount is enough


From here on, it seems like I'm missing a few photos (oops!). Step 4: Sew a cover, but making sure the sides are slightly longer than the actual height of the ottoman, so you can tuck the excess fabric under and staple it in place. Step 5: To make the bottom side, you can go lazy easy like me and simply sew a square piece of fabric and glue it. Or go with a suggestion I had [oh yeah, this ottoman gave way to an animated discussion on the design, the making of, the choice of color, the... pretty much anything! It was a Freakin I’m not doing another project with you again fun family DIY=)], which was to make use of rubber strips to make "legs" for the ottoman.

We've been enjoying this ottoman very much at home, especially on movie nights. And talks of making a second one might or might not have been heard...If any family member is reading this, you know who you are, YOU can add the piping, the tufting, the legs...
Tuesday, October 19, 2010
Before/After: Footstool & Hamper
 Hamper before
Footstool before
 After
After
Three layers of white acrylic paint and a new fabric later, voilàaa.
Also, I'd like to say thank you to Astrid of Grandma's Red Needle for the lovely award she sent my way! Go read about the adventures of a Norwegian woman in tropical Mauritius, it's so much fun:D & of course, check out her amazing quilts.

The rules say that I am supposed to say something about me, that you don't already know, then pass the award along to others. Let's go back to high school. hehe. Back then (graduated in 2003), I was way more into science that into art. I had no idea how embracing your creative side was something that could be so fulfilling!
Ok, I know it said pass along to others, but I'd like any of you crafty bloggers to grab the award. And to link back so I can visit you:)
Also, I'd like to say thank you to Astrid of Grandma's Red Needle for the lovely award she sent my way! Go read about the adventures of a Norwegian woman in tropical Mauritius, it's so much fun:D & of course, check out her amazing quilts.

Ok, I know it said pass along to others, but I'd like any of you crafty bloggers to grab the award. And to link back so I can visit you:)
Monday, October 4, 2010
Door stopper changes clothes

.:Door Stopper Before:.

.:Door Stopper After:.
I have had a sack of sand that serves me as a door stopper for ever and much like throw pillows, it changes dress often. For now it's burlap and stenciled LiveYourStyle, sewed as a pillow-case. I painted it with Fevicryl acrylic colors for fabric. A custom mix grey. The stencil was bought at Mr Bricolage, I was too lazy to go make my own. The burlap is actually from a re-purposed gift bag. The first few letters are kinda smudged, coz I made the rookie mistake of using too much paint on my brush. It really is better to "layer on paint" from a dry brush. By the way, just like whitewashing, stenciling is way too addictive. You get crazy ideas to stencil everything.
Tuesday, September 28, 2010
DIY Embellished Shoulder Top

Turning a plain tee into an embellished one using custom shoulder pads...

...with embroidered sequins and beads.


Step 1&2: Measure the length you want the shoulder pad to be on the front of your top. Ply a sheet of paper in two. Draw the outline of the shoulder pad and cut.


Step 3: Using your stencil, trace another similar shape on a sketch pad (Keep your stencil for later use*). Roughly sketch the design you want to create with your sequins& beads. This will be your reference.

Step 4: Transfer your design on your fabric (There are several methods, you can trace your design on tracing paper and simply pin it to the fabric, or use carbon paper or use a 4b pencil like I did to mark out the lines where to sew).
Step 5: Patiently sew on the sequins and beads. It took me 10 hours to complete both! But it could have been done in less, depending on the kind of sequins you use(if it comes already threaded or not) and the way of stitching(I double stitched each bead!) ..and how quick you are of course. I included pictures of some of the various methods.

1) Sew a bead on top of a sequin to hold it in place

2) Sew in between threaded beads


4) Sew one sequin at a time making sure each overlaps the other


Step 6: Cut out the shapes leaving a 1cm seam allowance, to which you snip small V shapes.
Step 5: Patiently sew on the sequins and beads. It took me 10 hours to complete both! But it could have been done in less, depending on the kind of sequins you use(if it comes already threaded or not) and the way of stitching(I double stitched each bead!) ..and how quick you are of course. I included pictures of some of the various methods.


2) Sew in between threaded beads

3) Sew one bead at a time


5) Sew threaded sequins
(Via Marshall Cavendish 'The Complete Encyclopedia of Crafts')


Step 8: Iron on reverse to flatten the pads before pinning them into place. Then hand stitch for them to stay put.

Voilà!
What I learned along the way: I would use a lighter fabric to make the reverse sides of the shoulder pads, just so it isn't too thick.
Subscribe to:
Posts (Atom)